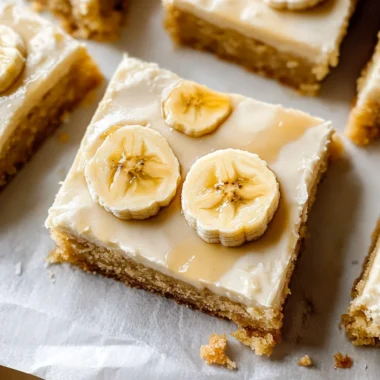
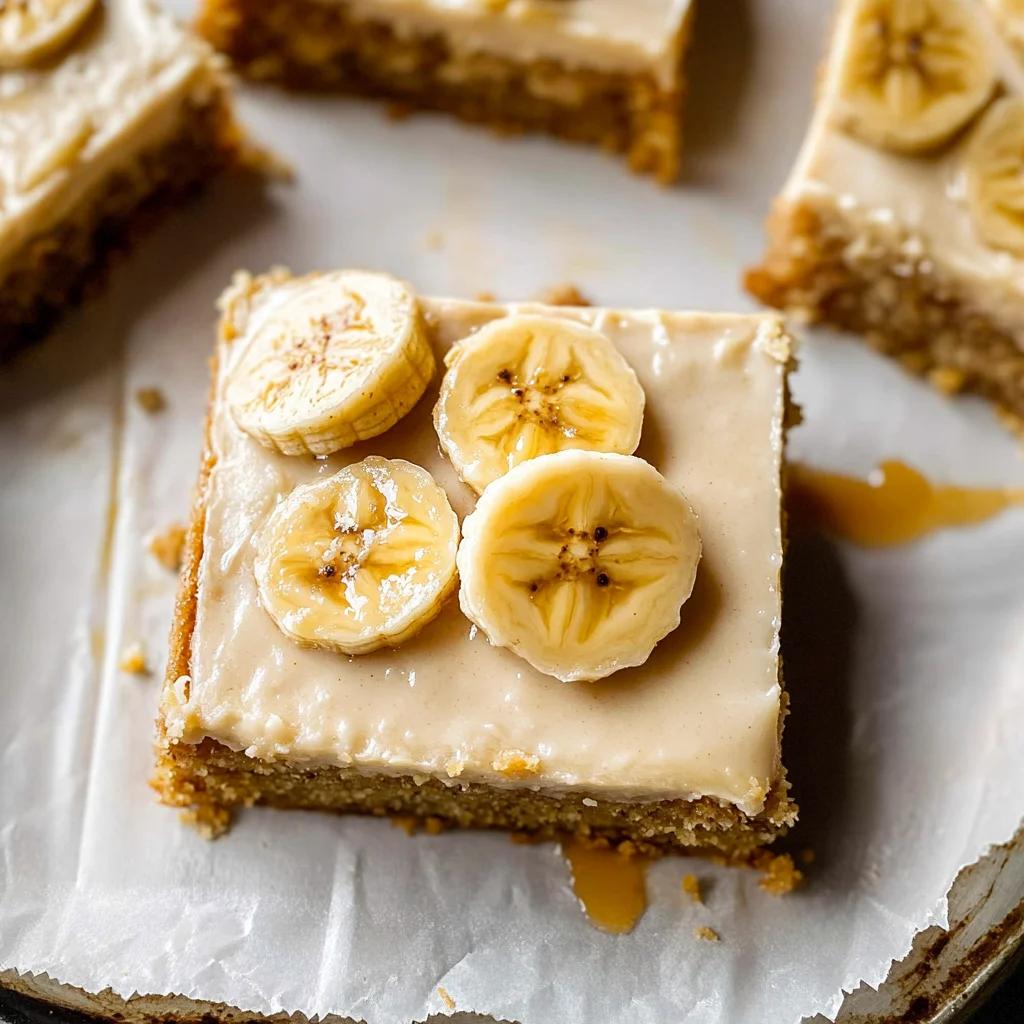
Imagine sinking your teeth into a warm, fluffy banana bar that melts in your mouth, bursting with the sweet aroma of ripe bananas and a hint of cinnamon. Each bite is a delightful symphony of flavors, perfectly balanced with just the right amount of gooeyness and crunch, making these banana bars an irresistible treat for any occasion.
As I recall baking these banana bars on lazy Sunday afternoons, the kitchen filled with laughter and the scent of baked goodness, it feels like a warm hug from my childhood. Whether it’s a cozy family gathering or a casual get-together with friends, serving these deliciously moist bars will have everyone asking for seconds—and maybe even thirds—because who can resist such a delightful experience?
Why are banana bars your new favorite treat?
Deliciously moist and packed with flavor, these banana bars are a delightful twist on classic banana bread!
- Quick to make in just 30 minutes, perfect for busy bakers.
- Versatile and easy, customize with nuts or chocolate chips to suit your taste.
- Crowd-pleasing and ideal for gatherings, they disappear fast!
- Nutritious yet indulgent, enjoy guilt-free snacking anytime.
Treat yourself to this irresistible recipe that will have everyone coming back for more!
Banana Bars Ingredients
For the Batter:
- 1 ½ cups ripe bananas (mashed, about 4 medium) – The riper the bananas, the sweeter and more flavorful your bars will be.
- 1 cup all-purpose flour – You can substitute with whole wheat flour for a healthier option.
- ¾ cup granulated sugar – Adjust to taste; brown sugar adds a richer flavor if preferred.
- ½ cup unsalted butter (melted) – This keeps the bars moist; coconut oil can be used for a dairy-free version.
- 2 large eggs – They help bind the ingredients together; use flaxseed meal mixed with water for an egg substitute.
- 1 teaspoon vanilla extract – Enhances the overall flavor; feel free to try almond extract for a twist.
- ½ teaspoon baking soda – Essential for leavening and achieving that perfect rise.
- ¼ teaspoon salt – Balances sweetness and enhances flavor; omit if using salted butter.
For Topping:
- ½ cup chopped nuts (walnuts or pecans) – Adds crunch; you can leave them out if nut-free is preferred.
- 1 cup chocolate chips (optional) – Semi-sweet or dark chocolate chips work well for added indulgence.
These delicious banana bars are sure to become a family favorite, so get ready to enjoy a delightful treat!
How to Make banana bars
1. Preheat your oven to 350°F (175°C). This is the perfect temperature for baking those delicious banana bars, ensuring they come out soft and fluffy every time.
2. Mash 3 ripe bananas in a bowl until smooth. Don’t worry about lumps; they add character! The riper the bananas, the sweeter and more flavorful your bars will be.
3. Mix together melted butter and sugar in a large mixing bowl until well combined. This creates a beautiful base for your banana bars, enhancing their moistness and sweetness.
4. Add the mashed bananas and mix until fully incorporated. You’ll notice the batter starting to take on a lovely, creamy texture that’s simply irresistible!
5. Stir in 2 beaten eggs and a splash of vanilla extract. These ingredients bring warmth and depth to your banana bars, making them feel like a cozy hug in dessert form.
6. Combine flour, baking soda, and salt in another bowl. Then slowly fold this dry mixture into the wet ingredients until just combined—be careful not to overmix!
7. Pour the batter into a greased baking pan, smoothing out the top with a spatula. This ensures even baking and helps achieve that golden-brown finish we all love.
8. Bake for 20-25 minutes or until a toothpick inserted comes out clean. Keep an eye on them toward the end; you want that perfect balance of moistness without being gooey.
Optional: Top with sliced bananas or chopped nuts before serving for added texture.
Exact quantities are listed in the recipe card below.
Tips for the Best banana bars
- Choose Ripe Bananas: Use overly ripe bananas with plenty of brown spots; they provide the sweetest flavor and best moisture for your banana bars.
- Don’t Overmix: Mix just until combined to avoid dense bars. This keeps them light and fluffy, which is essential for delicious banana bars.
- Cool Completely: Allow your banana bars to cool fully in the pan before cutting. This helps them set properly and prevents them from crumbling.
- Storage Savvy: Store in an airtight container at room temperature for up to three days or refrigerate for a week. They stay moist longer that way!
- Add Variety: Feel free to mix in nuts, chocolate chips, or dried fruit. Just remember not to overload your batter to maintain that perfect texture.
How to Store and Freeze banana bars

Room Temperature: Keep banana bars in an airtight container at room temperature for up to 3 days. This keeps them moist and flavorful for those quick snacks!
Fridge: If you want to extend their life, store banana bars in the fridge for up to a week. Wrap them tightly to prevent drying out while keeping that delightful taste.
Freezer: For longer storage, freeze banana bars individually wrapped in plastic wrap, then place them in a freezer-safe bag. They can last up to 3 months this way!
Reheating: To enjoy frozen banana bars, thaw them overnight in the fridge or microwave for 15-20 seconds until warm. Perfectly soft and delicious every time!
Banana Bars: Fun Twists Await
Ready to make these delightful treats your own? Let your creativity shine through as you explore these delicious options!
- Nut-Free: Swap the nuts for sunflower seeds for a crunchy texture without the allergens. These seeds add a unique, nutty flavor that’s sure to please.
- Gluten-Free: Use almond or coconut flour in place of regular flour to make these bars gluten-friendly. They’ll still be moist and flavorful, perfect for everyone at the table.
- Choco-Lover: Stir in chocolate chips or chunks for an indulgent twist. The rich chocolate melts beautifully, creating pockets of gooey goodness throughout each bite.
- Spicy Kick: Add a pinch of cayenne pepper or ground ginger for a surprising heat. This subtle spice will elevate the sweetness and make every bite exciting.
- Fruit Fusion: Mix in shredded coconut or diced pineapple for a tropical flair. These additions bring a fresh burst of flavor that transforms your banana bars into an exotic treat.
- Vegan Delight: Substitute eggs with flaxseed meal mixed with water and use maple syrup instead of honey. You’ll enjoy all the richness without any animal products!
- Yogurt Boost: Replace some of the butter with Greek yogurt for added moisture and protein. This swap also makes the bars wonderfully tender and fluffy.
- Nutty Flavor: Incorporate almond or peanut butter in place of some butter for an irresistible nutty taste. It adds depth and richness that complements the bananas perfectly.
Make Ahead Options
If you’re like me, you know that the secret to a smooth week lies in meal prep, and these delightful banana bars are no exception! You can easily prepare the dry ingredients—flour, baking soda, and spices—up to 3 days in advance. Simply store them in an airtight container to keep them fresh. For the ripe bananas, mash them ahead of time and refrigerate for up to 24 hours. When you’re ready to bake, mix everything together with the wet ingredients and pour it into your prepared pan. To maintain the quality of your banana bars, make sure they cool completely before slicing and storing in an airtight container for up to a week. Enjoy the time-saving benefits and deliciousness of these homemade treats throughout your busy week!
banana bars Recipe FAQs
What type of bananas should I use for banana bars?
For the best flavor and sweetness, opt for overripe bananas with plenty of brown spots. These bananas are soft and mushy, making them perfect for mashing into your batter. If you have some that are just starting to turn brown, those will work too; just ensure they’re not too green!
How should I store my banana bars?
Once your banana bars are completely cooled, store them in an airtight container at room temperature for up to 3 days. If you want to keep them fresh longer, placing them in the fridge can extend their life to about a week. Just be aware that refrigeration might slightly affect their texture.
Can I freeze banana bars?
Absolutely! To freeze your banana bars, first slice them into individual portions. Wrap each piece tightly in plastic wrap or aluminum foil, then place them in a freezer-safe bag or container. They’ll stay fresh in the freezer for up to 2-3 months. When you’re ready to enjoy them, simply thaw at room temperature or pop them in the microwave for a few seconds.
What should I do if my banana bars turn out too dry?
If your banana bars come out dry, it’s likely that they were overbaked or there wasn’t enough moisture from the bananas. For next time, try reducing the baking time by a few minutes — oven temperatures can vary! Adding an extra mashed banana or a splash of milk can also help keep things moist and delicious.
Can I make these banana bars gluten-free?
Yes! You can easily adapt this recipe to be gluten-free by substituting all-purpose flour with a 1: 1 gluten-free flour blend. Just check that your baking powder is also gluten-free. You’ll still get that tender texture and scrumptious flavor while catering to dietary needs.
Are there any nut-free alternatives for adding crunch?
Certainly! If you want some crunch but need nut-free options, consider using seeds like sunflower seeds or pumpkin seeds. You could also fold in some chopped dark chocolate or even oats for added texture without any nuts. It keeps everyone safe while adding delightful variations!
Banana Bars
Ingredients
Method
- Preheat your oven to 350°F (175°C).
- Mash 3 ripe bananas in a bowl until smooth.
- Mix together melted butter and sugar in a large mixing bowl until well combined.
- Add the mashed bananas and mix until fully incorporated.
- Stir in 2 beaten eggs and a splash of vanilla extract.
- Combine flour, baking soda, and salt in another bowl. Then slowly fold this dry mixture into the wet ingredients until just combined.
- Pour the batter into a greased baking pan, smoothing out the top with a spatula.
- Bake for 20-25 minutes or until a toothpick inserted comes out clean.